How to Write a Crochet Pattern in CrochetWriter: A Pattern Editor Walkthrough
How to Write a Crochet Pattern in CrochetWriter: A Pattern Editor Walkthrough
Writing a crochet pattern is equal parts craft and logistics, you need to capture every stitch accurately while keeping the document readable for whoever picks it up. CrochetWriter's pattern editor is designed to handle the logistics so you can focus on the craft.
This walkthrough covers everything you need to know to write a complete pattern, from your first heading to your final round.
The Basics: Adding Content Blocks
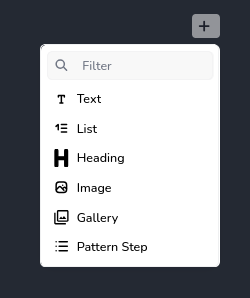
The CrochetWriter editor works a little like a blog editor. There is a menu to add blocks for different types of content.

The available blocks are:
- Paragraph: for introductory text, materials lists written as prose, or notes
- Heading: for separating sections like Materials, Gauge, and Pattern
- List: for materials lists, abbreviations, or any enumerated content
- Image: for a single photo (finished object, in-progress shots)
- Gallery: for multiple photos laid out together
- Page Break: to control where pages split in the exported PDF
- Pattern Step: the core block for writing your actual pattern rows and rounds
- Column: a two-column layout block for placing content side by side
For most patterns, you'll use headings to create the document structure, lists for materials and abbreviations, and Pattern Steps for the pattern body itself.
The Column Block
The Column block splits the page into two columns, each of which supports thsi set of blocks: paragraphs, headings, lists, images, galleries and pattern steps. Columns can't be nested inside other columns.
This is useful for patterns where you want to show two things alongside each other, for example:
- A written round next to a stitch diagram or photo
- A materials list next to a gauge swatch image
- Two separate pattern sections (such as left and right pieces) shown in parallel
Pattern Steps: The Heart of the Editor
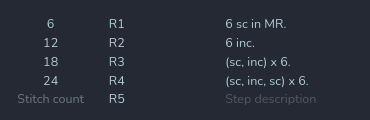
The Pattern Step block is what sets CrochetWriter apart from writing a pattern in a word processor. Each step represents a single round or row and has three fields:

- Round number: the round or row number (e.g. Round 1, Row 3)
- Description: the written instructions for that round
- Stitch count: the total stitch count at the end of the round
Together, these three fields map directly to how most crochet patterns are written and read, and they're the basis for the clean, consistent formatting in your exported PDF.
Automatic Stitch Counting
As you write the description for a Pattern Step, CrochetWriter counts your stitches automatically. If you write something like sc in next 6 sts, 2 sc in next st it will tally the stitch count and fill it in for you.
You can override the automatic count at any time by clicking the stitch count field and entering a number manually. This is useful when:
- Your description uses shorthand or abbreviations that aren't parsed automatically
- You simply want to double-check and confirm the count yourself
The automatic count is a starting point, not a constraint.

SmartFill: Generate a Step from a Stitch Count
SmartFill is a feature for when you know where you need to end up but haven't written the instructions yet.
If you enter only a stitch count into a Pattern Step, leaving the description blank, CrochetWriter will look at the previous round and attempt to generate a description that gets you from there to your target count.
For example: if Round 3 ended with 18 stitches and you enter 24 as the stitch count for Round 4, SmartFill will suggest a description that increases by 6 stitches from the previous round's structure.
SmartFill works best for:
- Simple increases and decreases with a predictable distribution
- Even rounds where the stitch count stays the same as the previous round
- Quickly scaffolding a pattern that you'll refine afterward
It's a suggestion, not a final answer, always review and adjust SmartFill's output before publishing.
Page Breaks and PDF Structure
Page breaks give you manual control over how your pattern splits across pages in the PDF. Add one anywhere in the editor and the content after it will start on a new page.
A common approach is to place a page break before the pattern body so that your materials, gauge, and notes section sits on its own page, and the rounds start cleanly on the next.
Tips for a Clean Pattern
A few habits that make patterns easier to read and export well:
Use headings to separate sections. A typical structure might be: Materials → Gauge → Abbreviations → Notes → Pattern. Headings make the document scannable and translate cleanly to the PDF.
Using the heading also gives you the possibility of adding a table of contents in the editor.
Number your rounds consistently. If you switch between "Round" and "Row" (e.g. for flat sections within an in-the-round pattern), call that out in your abbreviations section so readers aren't confused.
Add a page break before the pattern body. Keeping the front matter and the rounds on separate pages is a small touch that makes your PDF feel professionally laid out.
Use SmartFill to scaffold, then refine. If you're working through a pattern quickly, you can rough in stitch counts with SmartFill and go back to polish the descriptions afterward.
That covers the core of the CrochetWriter editor. If you have questions or run into anything unexpected, reach out to me here: gabescrochetlab@gmail.com, feedback from real patterns is how the tool keeps improving!